Sunday, July 5, 2015

Installing the drawers into the table frame!

When adding the drawers to the table frame you're concerned with two measurements: the depth and height of the slide.  There are a few factors we want to make sure we cover when installing the drawers.

1.  We want the drawer to slide just above the opening, which means we need to leave a gap of about 1/16".  I know this doesn't seem like much but these slides are precision and don't sag so when  you set a height it stays that height now matter what you put in the drawer.

2.  We want to drawers to be able to lock when closed so they don't slide around when you move the table.  We need to make sure the face of the drawer doesn't hit the table frame before the drawer is closed so the correct depth is critical.

3.  We want the drawer to be level so both slides must be set exactly at the same measurements.

Let's begin by arranging the drawer and the inner slides to the correct orientation.  We need to first pull out the inner slides from the slides attached to the table frame.  To do this just pull out the inner slides to their full extent.  You should now see a black lever about halfway down the slide.  Hold this lever up or down, depending on the side you are pulling out, and "slide" out the inner slide piece.

Place the two inner slide pieces next to the drawer in the orientation you want the drawer to slide.  You can pick either end of the drawer but I like to pick the side that has the cleanest looking inside that will show when you open the drawer.   


First we'll setup the depth for the inner slide by using a Combination square and setting the depth of the square to the measurement shown below.  This measurement is how far back we will set the depth of the inner slide from the front face of the drawer.  

CRITICAL:  This depth measurement is critical because this measurement sets the face of the drawer so it sits just outside the face of the table frame when closed; this way when you attach the drawer face it won't hit the table frame when the drawer is closed all the way.


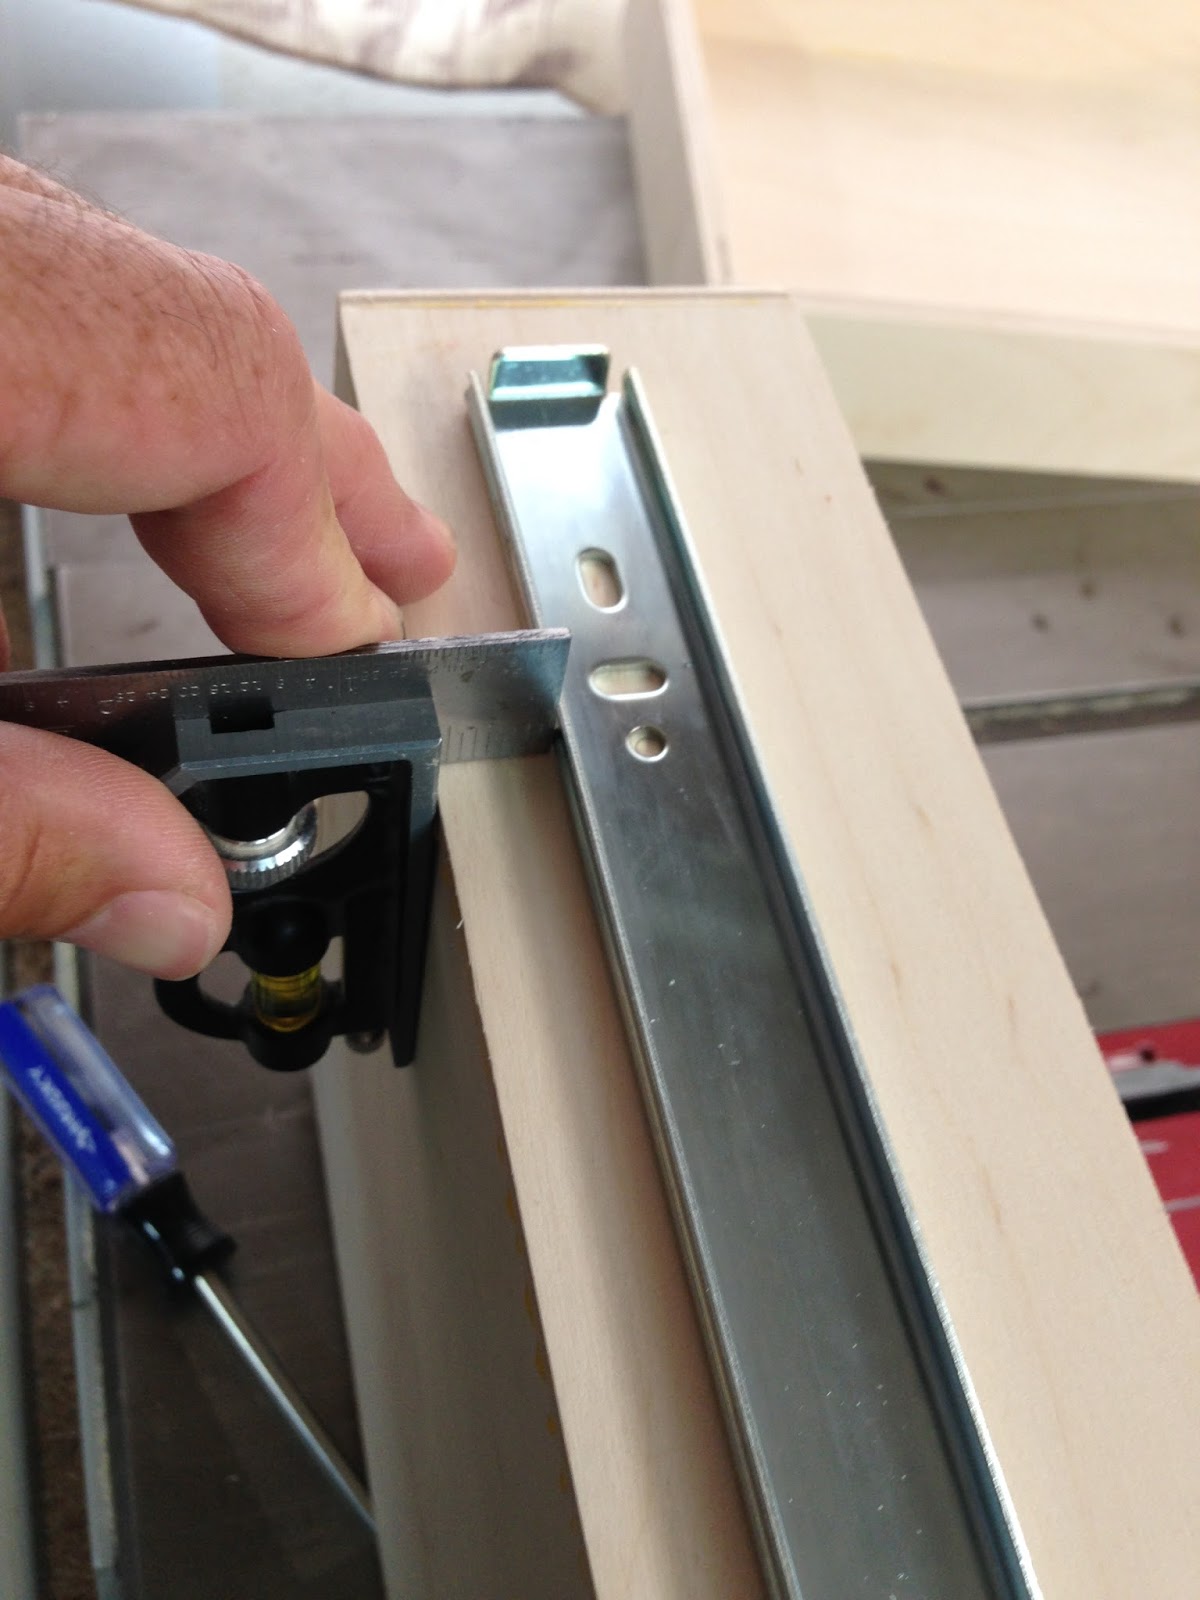
Lay the inner slide on the side of the drawer with the bent metal end facing the direction of travel for how the drawer will slide out.  Place your Combination square as shown with the ruler touching the front of the inner slide.  Take a pencil and mark a line at the front of the inner slide piece.


Now let's set the height of the inner slide.  Adjust the combination square to the new measurement below.  This is how high the inner slide will be from the bottom of the drawer.


Place the combination square on the bottom of the drawer toward the front edge as shown below and place the bottom edge of the inner slide against the combination square ruler.  Make a pencil mark on the drawer under the edge of the inner slide.


Now place the combination square on the bottom of the drawer toward the back edge as shown below and place the bottom edge of the inner slide against the combination square ruler.  Make a pencil mark on the drawer under the edge of the inner slide.


With the inner slide in place "adjusted to where the pencil marks are" go ahead and mark the holes where you will drill the hole for the screws.  Shown below is where the pencil marks should be on the front and back of the inner slide.


Now remove the inner slide and use a 3/32" drill bit to pre-drill each of the two holes for the inner slide "front and back".  

NOTE:  Don't drill too far or you'll end up drilling your prep hole through the side of the drawer.  You can use a piece of tape around the drill bit to mark off just how far down you can drill before it will drill through the side.


Go ahead and hand screw in the slide screws so they stand on their own, then use an electric drill to tighten them to the drawer.  DO NOT OVER TIGHTEN!  Make sure you don't over tighten or you will strip the drill hole and you'll have to make another one in another place.


Once you've finished the first side of the drawer go ahead and follow the same procedures as above to complete the other side of the drawer.  

Below are all the steps for the other side of the drawer.


Here is the finished drawer installed and pulled out to its full extent.


After you finish the first drawer go ahead and do the same steps for the other three drawers!  Check each drawer for its level, range, and make sure you have a little overhang to the front face of the table frame so you can attach the drawer face plate and still close the drawer.  Each drawer should lock in place when closed.

In the next post we will cover attaching the drawer face plate to each drawer.


Friday, July 3, 2015

Making the four drawers from the Birch plywood left over!

So let's build some drawers!  Since we have a lot of leftover 1/2" Birch Plywood stock, we can use this to make our drawers.  This is actually perfect material for the drawers because 1/2" Birch plywood already has a nice smooth finish, is strong, and isn't too thick. 

Below is a photo of the stock I had leftover from the Table base, the gaming board, and the inner base table cutout!


Since we have a number of extra pieces, we need to find one that is at least 11" wide. Each drawer will be approximately 11" with the gap for the drawer being just a hair over 11".   With each drawer you have a base plate and four sides.  Each of these four sides will be routed so as to create a stronger more secure fit but more on that later.
First let's cut down the four base plates!

Take one of the long pieces that is over 11" wide and make a mark at 14-3/4"!  This will be the first base plate and after this first cut you will be setting up a stop-block to cut the other three at the exact same length.


After that first cut go ahead and setup the stop-block as shown below.  With the stop-block in place, you can now cut the remaining 3 base plates without having to mark each one!

NOTE: The stop-block should be set at a distance of 14-3/4 inches from the cut line!


We now need to trim the four board down to a good starting with of 11 inches,  Set the table saw to 11" and trim each board down.  This initial width of 11" will get trimmed down again once we get closer to putting the drawer together and finding the perfect fit within the slides.


Here are the four drawer base plates cut to length 14-3/4" and trimmed to a nice starting width of 11".  This wide will be trimmed down again once you have the side pieces routed.


With the [4] base plates cut we now need to cut 8 side pieces and 8 front and back pieces, these you can cut from any stock that is at least 15 inches long and 3 inches wide!  

The actual height of the drawers will be 2-3/4".  This is just enough height to give about 3/16" clearance within the opening: 2/16" on the top and 1/16" on the bottom.  Since you are using these drawers for game storage or for game components, you want as much storage space as possible.  

You will need to grab a piece of the excess Birch plywood that is at least 15" wide because we will be cutting this piece into 2-3/4" strips.

Set your table saw to 2-3/4" and cut 16 pieces, you will be cutting down eight of the pieces for the front and back because these will be 11" length, which is the width of the gap for the drawer!

CRITICAL:  Before you cut the back and front piece to 11" make sure your gap is actually 11"!!  Your measurement may vary so double check this gap measurement before making a length cut!


After you've cut all 16 pieces let's get them ready for their Rabbet joint!

We will prep each board for the router by making a slot cut on one side of the piece.  We want to create a Rabbet joint with all the pieces so they will produce a stronger drawer when glued together.  Just gluing all the pieces side-by-side will not give you a solid hold and will tend to produce drawers that are out of alignment or end up coming apart!  A Rabbet joint will create two side for each piece to use for gluing instead of one and in turn makes the drawer set square and strong.

To prep each piece we'll cut an initial slot at the measurement shown below, which when you include the blade thickness, will end up being at the 1/2" mark!  This prep cut provides two purposes: One is to take some extra material off to help the router so it doesn't have to cut through as much material and two, to have the 1/2" mark set and all the router has to do is trim off the excess material to make the Rabbet joint.


Since we are using 1/2" thick Birch plywood to make the drawers, you need to set the height of the table saw blade to 5/16" high.  We're going to prep all 16 boards by cutting a slot down one side of the board.

NOTE: Cut only one side of each of the 16 boards.


Below are the eight drawer SIDE boards with the first cut along the long side of the board.


Now take the 8 front and back boards and turn them 90 degrees to make another cut exactly as the previous cut but only on one of the short sides as seen below.

CRITICAL:  Don't change any of the setting or adjust the blade height or fence. This will be the same 1/2" cut setting.

This cut will now go along the short side of the 8 boards.


Here are the 8 front and back pieces.  


NOTE:  Below you can see three boards that are longer than the others and that's because they came from a different piece of plywood.


Now it's time to setup the router and trim off the excess material from the eight pieces. 

Set the router to a height of 5/16" high.


Set the fence so the "1/2" square router bit" only trims off the excess material as shown below and doesn't cut beyond the prep cut!


WARNING: Always make sure when using your router that you keep fingers away from the spinning bit and the end of the material as it moves over the bit.


Below is how the drawer SIDE board should look after you route the edge.  Remember, only route the side that has the prep cut on it!


Here is a close up of how the Rabbet joint should look when cut.


Below is how the joint will look with the two pieces are put together!  Notice how the joint has more material and sides for gluing and will give you that strong square fit!


Now take the eight front and back boards and routing off the short side edge!  Just route the short side with the prep cut on it only.  


Below are all eight front and back boards ready to be cut down to exact length so they will fit within the drawer slide gap on the table.


Now that we have the 16 boards routed and ready, we need to cut the boards to the correct length to make the drawers fit within the slide gap.  We'll cut the drawer SIDE pieces first, since we don't want the drawers longer than 15" in length we'll cut them 14-3/4" long.  Setup your table saw to 14-3/4" or your table sled as shown below.  If using the sled you will be using a stop-block at the 14-3/4" measurement so you can cut each board exactly the same length quick and easy!

We will do the same setup for the front and side pieces.  Setup your table saw or sled to a measurement of 11"!  If using the sled you will be using a stop-block at the 11" measurement so you can cut each board exactly the same length quick and easy!

Below is the front/back piece being cut to the correction length!


When you cut the front and back boards to the correct length, go back to the router and route of the third edge of the board.  Below you can see front/back piece ready to be glued.


Below you can see the drawer "TEMPORARILY" put together to make sure everything fits and is square.  At this point take your length and side measurements and make sure they will fit snug within the drawer slide gap!  

CRITICAL: Make sure you don't glue the drawer together until after you've made sure it fits within the gap exactly!


I've double checked the measurements and verified the drawer fits within the gap so it's time to glue the pieces together!  Put glue on each of the edges then fit the drawer together, use the following clamp configuration to glue your drawer together!


Let the drawer glue for 24 hours before you pull the clamps off.  When the first drawer is finished gluing, go ahead and glue the remaining three drawers the exact same way.

in the next post we'll cover installing the drawers into the table frame.

See you then.