Wednesday, July 29, 2015

Adding support to the upper portion of the table leg!

So for this final post regarding the table legs we are going to finish off the upper table leg support pieces.  These four pieces "one for each table leg" will attach to the top of the table leg against the table frame and strengthen the leg to the table frame.

These pieces won't be visible to people so you don't have to use the most perfect looking piece of stock material.  I grabbed some extra stock and rip cut it to a width of just under 4"!

Since the actual table frame is 4" wide I wanted to make sure you didn't see this piece from under the table.  So, to begin set your table saw to 3- 14/16" and rip cut the board to this width.

NOTE:  Make sure the board length is at least 35" long to cover all four pieces.


Below you can see the board after the rip cut and ready to be sectioned into four pieces.


Since this support piece will be attached at a 45 degree angle, you will be cutting each end at a 45 degree angle to match!  You can use a number of methods to make this cut: Miter saw, table saw, even a skill saw!  I prefer the table saw with the blade set at 45 degrees!  It's easy to cut each piece since you cut one end then flip it over and cut the other end!  Done!  

Then length of the piece is 6 - 1/8" long "on the inside measurement"!  

NOTE: Don't try to cut each piece to the exact measurement!  It's easier to cut one piece at a time to just over the correct length and then trim it down it small passes on the table saw so it fits the piece in place flat and snug!!

Below you can see a support piece after it's been cut on the table saw with the two ends at 45 degree angles!   


Here I'm trimming off the edge in small passes to get the piece to the exact measurement needed!


When you have the first piece cut you need to drill the hole for the support bolt!  Below you can see the measurement of the bolt as it sits on the table leg.  You can see that the top of the bolt is at the 2" mark from the BOTTOM of the table leg routed area!!

We need to transfer this measurement onto the support piece.


Let's begin by creating a center mark on the support pieces with the same method we used for the drawer plate.  Use a ruler and rest it against the piece diagonally from corner to corner.  Make a pencil mark in the middle of the piece as shown below.


Now do the same thing on the opposite corners.


Now make a pencil mark that goes down through the center of the X so you can measure off the 2" from the bottom to create the bolt hole.


Below you can see the pencil hole marked on the center line and directly below the 2" pencil mark from the bottom of the piece.  This is where you will be drilling your hole for the leg support bolt!  You can use a 5/16" drill bit to drill this hole.


Secure the piece to a bench or table and make sure there is nothing below the material. You don't want to be drilling into your workbench so be careful!!


When drilling the hole make sure you expand the hole by moving the drill in a circle while drilling.  This will help widen the hole yet not make it too wide to support a 1/4" washer!

To widen the hole you just turn the drill at an angle while drilling and move the drill around in a circle on the piece.  You only need to angle the drill at about 80 degrees.


Below is the piece with the hole drilled in it!


Now it's time to use the KREG pocket hole jig and drill the four screw support holes.  First make a pencil mark on both edges of the short width sides.  These are the sides that are a little under 4" in width.  Take a ruler and make a pencil mark that will be a 1/4" from the edge of the support piece.   See photo below.  

CRITICAL:  Make sure your line is no less than 1/4" wide or when you screw in the KREG screws they may pop through the surface of the table frame!!!


Once you have the edge pencil mark, make a check mark 1" from the edge of the piece ON THAT LINE you just made.  This 1" pencil mark will be perpendicular to the line you just made.  You will make two marks on each side of the support piece for a total of 4 marks.  These pencil marks will be the starting location of the KREG portable pocket jig!


If you purchased the full KREG kit you should have the little portable pocket hole jig that allows you to drill a pocket hole on any material without having to use the main unit.  As you can see below, this little hand held device comes with a KREG clamp and you can clamp it down in any direction on the piece of material!

To setup the portable pocket hole jig, place in on the support piece with the front center of the jig resting against the center mark you just created.  Then make sure you rotate the jig so it points at an angle to the edge of the support piece as shown below!

NOTE:  Make sure you have the front of the jig resting on the line and centered on the check mark.


In the two photos below, you can see how I've rotated the jig at an angle toward the edge of the support piece.  The jig should just be hanging over the edge of the support piece when clamped down!

CRITICAL:  The KREG clamps is an adjustable wrench with a wide end piece to hold the material. Make sure you tighten this clamp so it holds the support piece VERY secure while drilling.  You need to put a lot of pressure on the drill to drill the pocket hole and if it's not secure you could end up pushing the jig down and drilling through the end of the support piece, making it useless!

The reason behind angling the pocket hole jig toward the outside of the support piece is to make it easier to clear the top and bottom of the table frame while screwing in the pocket hole screws.  This slight angle helps you clear the table frame edge!


Hold the support piece in place and use the KREG drill provided to drill the pocket hole.

WARNING:  Be careful where and how you hold the support piece while you are drilling!  Be careful how you hold the support piece because the drill tip ends up drilling through the edge of the support piece just a little bit which can cut your fingers or damage the surface of what you are resting the support piece on.  

KEEP YOUR FINGERS AWAY FROM THE END OF THE SUPPORT PIECE WHILE DRILLING!


Below you can see the first hole drilled into the support piece; only three more to go!!
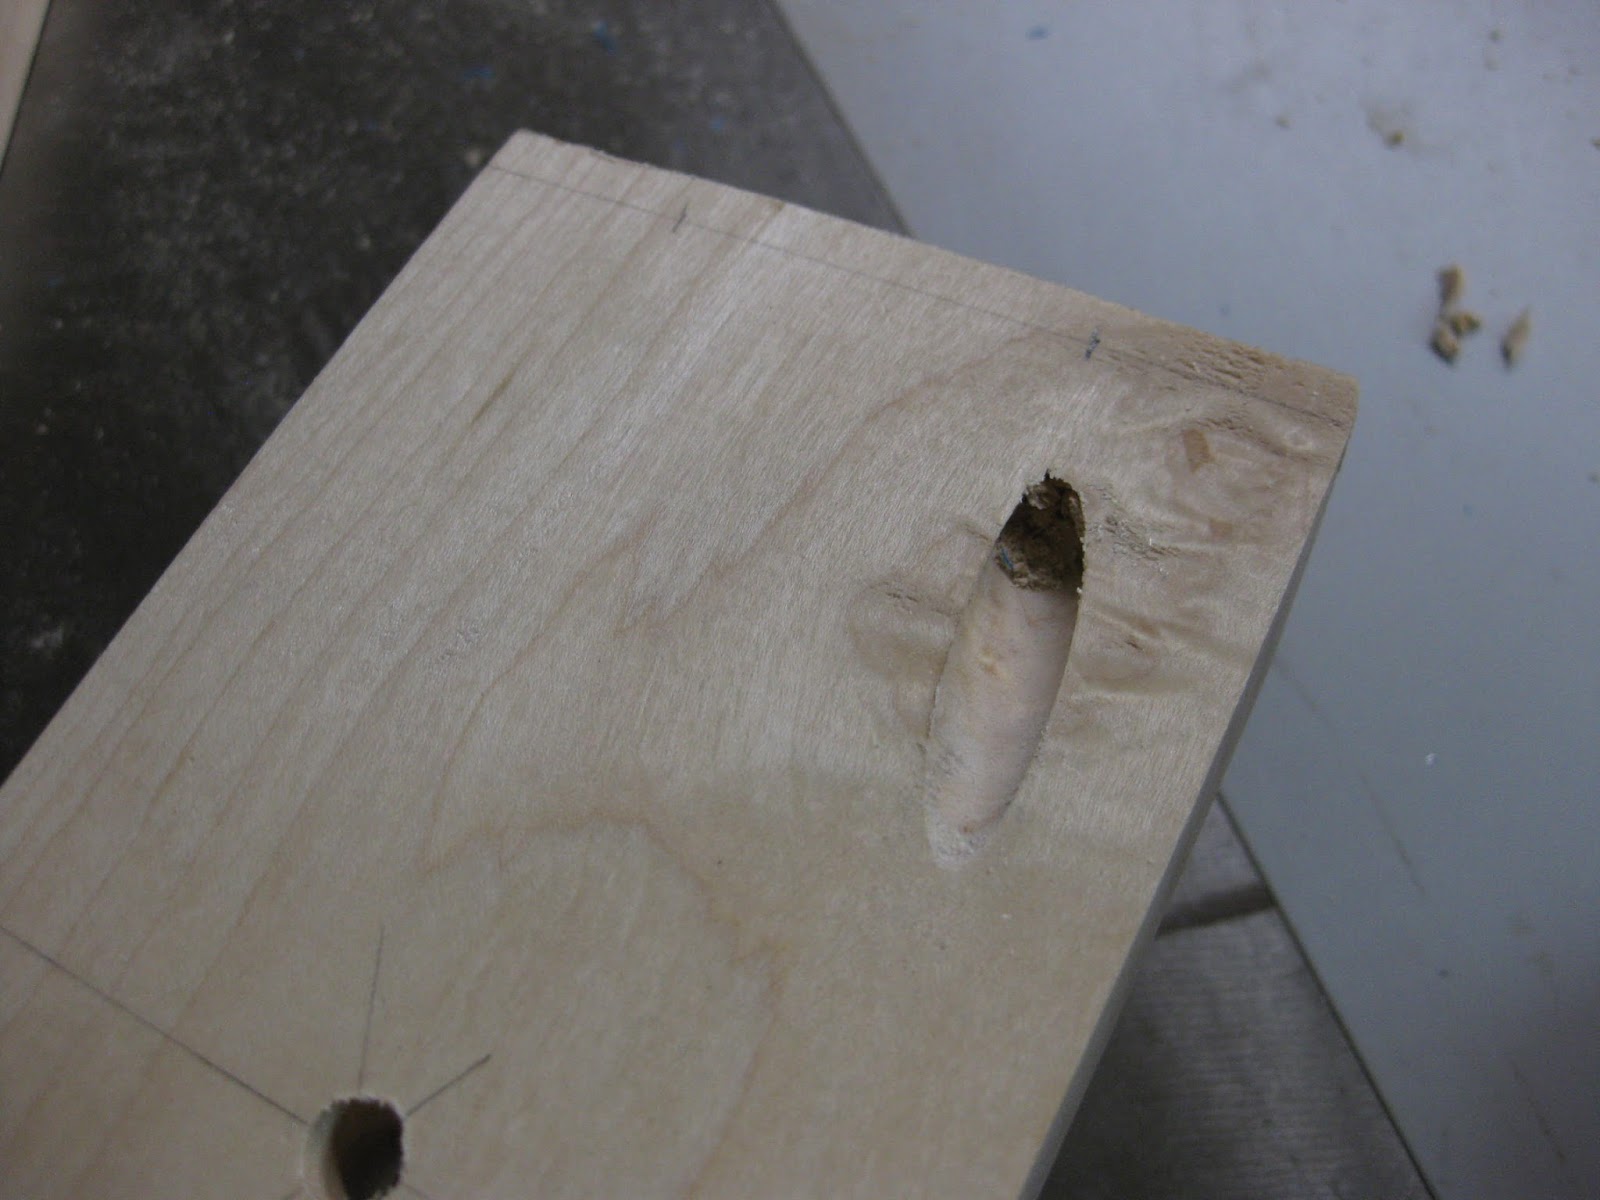

Now let's drill the second pocket hole.  Follow the same procedures at above to drill the second hole with the angle and the center spacing.


Below you can see the second hold drilled; one side complete!


Now we can rotate the support piece and drill the other side.  Again, follow the procedures as above and drill each pocket hole at the proper angle and centering.


Below is what your support piece should look like when all four holes have been drilled! Notice the slight angle of each drill hole facing outward toward the edge of the support piece.  This is going to save you when you drill the support piece into the table frame!


Below you can see the support piece "temporarily" set in place over the support bolt and bolted in place.  You can see how each 45 degree end is flush with the table frame and the support piece is flat against the table leg!!

CRITICAL:  The support piece MUST rest flat on all sides attached to the table leg and frame!  Keep trimming down the sides of the support piece until it rest perfectly flat against the table leg and the 45 degree angles are flat against the table frame!  If there is any kind of gap on any of these three locations, when you tighten the nut on the support bolt you could end up cracking the support piece or putting too much strain of the screws used to attach the table leg to the table frame!!  Take your time and get this piece cut correctly, it will pay off in the end!


When you have a nice perfect fit of the support piece, go ahead and use it to help drill the support bolt hole on the other three support pieces.  Just lay the support piece with the hole drilled in it already ON TOP of the piece that needs to be drilled. Line them up and drill the hole.  After you remove the top piece use the same method of rotating the drill around in a circle and widen the hole as you did for the initial support piece. 


After you've drilled the support bolt hole and checked that each of the four support pieces fit the table frame flat and snug, go ahead and screw them into place.

Below you can see each hole being secured with a KREG screw and how you are able to clear the table frame due to the angled holes!!

WARNING:  Make sure you don't over tighten the KREG screw or you'll break the screw head and render it useless which will cause you to remove the support piece and remove the broken screw!


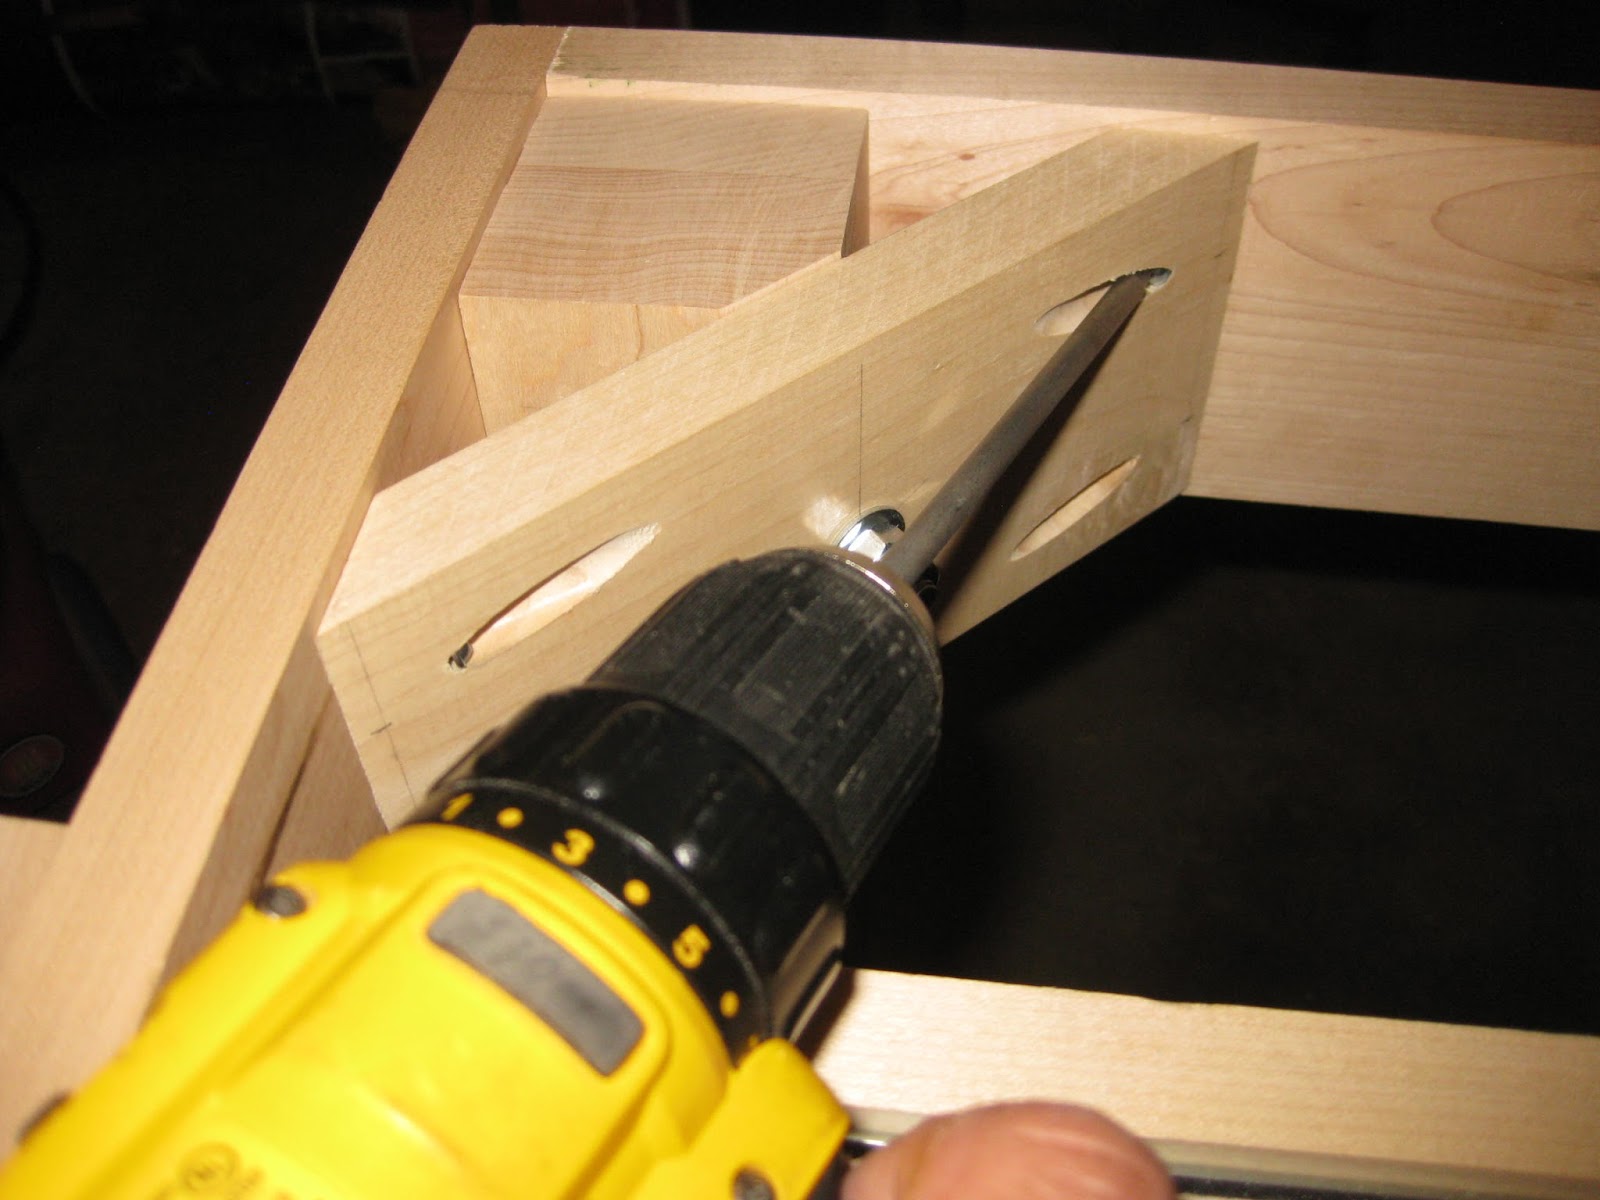


Once you have all four screws secured in place, you can tighten the nuts to their final position.  Again, try not to tighten the nuts too tight and make sure you add the second nut so it will lock the two nuts in place and you won't have to worry about them coming loose later on!

Below you can see the final setup of the support piece secured in place on the table frame and table leg!


This concludes all the posts related to the table legs!!  Next we will focus on the LONG and SHORT SIDE Arm Rests!

See you soon!

Tuesday, July 28, 2015

Adding trim to the bottom of the table legs!

In this short post I'll be showing you how to add trim to the bottom of the table legs.  It isn't necessary and you can use the table without adding this decoration to the bottom of the legs but when you see them you'll understand why I did it!  They add so much to the table legs and just perfectly finish them off.

To complete all four legs you'll need a piece of hard Maple that is 7' to 8' long and at least 4" wide!  You'll be planing this down to a little over 1/2" thick but if you don't have a planer you can just use what you have.  Be aware that if you can't plane down the wood your trim is going to be pretty thick and may stand out on the bottom of your table legs.  You may want to tape them to the bottom of the legs and see what they look like before you glue them in place.

Take your stock of material and set your table saw to 3-1/2" width.  We need to rip cut this material width down before we plane it.

below you can see the stock I had rip cut down to the 3-1/2" width.  You'll notice this isn't 7' or 8' feet in length because at the time I didn't have that much material left.  So what you see below only allowed me to trim the two front table legs!

NOTE:  I ended up rip cutting my stock to a little over 3-1/2" because I'll be planing the surface as well as the width down to exact size.


 Below is the cut piece ready to be put through the planer.


First I planed the edge and trimmed it down to the exact 3-1/2" width!  This is better because you're able to clean off any burn marks or nicks!


Now I'm planing it down to a thickness of 5/8"!  Since the material starts out over 3/4" thick, don't try to plane down large chunks it's easier to run it through in slow, gradual passes.   This is also better because you have to do less finish sanding due to the smooth edge the planer creates!


Now that we have the stock planed down to the correct width and thickness, we need to route the edge design to give it it's character!   We will be using a 1/4" round-over bit and setting it so it hits the middle of the board and not the edge like you'd normally use it.

The weird cylinder you see at the top of the bit it where the precision bearing was attached. You have to remove this so you can take advantage of the upper cut portion of the bit.  You will be setting the two cut points, which are the top of bottom of the round-over, to be as centered as possible to the wood edge.


Make sure you have the top and the side secured on the router table so you don't get any drift while pushing the piece on the router table.  Below you can see how I used a feather board and an extra piece of wood to secure the piece yet it's still able to move along the router table surface.

CRITICAL:  Make sure you close the air gap so it's as tight as possible to the router bit.  The air gap is the distance from the edge of the cutting surface of the bit to the edge of the fence piece. As you can see in the photo, I've created as small of a gap as possible so the spinning router bit just misses the two fence plates.  The bigger the gap you leave from the bit to the fence plate will produce rip out or chipping. This can destroy the look of your piece and make it so you may not be able to use the piece of material for your table!!!


Below you can see the design patter left by the round-over bit when it is centered on the edge of the material and not just on the corner.


Now let's go through and cut out each piece for the trim on the bottom of the table leg.  You'll need four pieces to create the bottom trim and these four pieces will be glued together to the bottom of the leg.

I'll be using a compound miter saw to cut the 45 degree angles for each piece of trim.

Go ahead and set your miter saw to 45 degrees!  If you don't have a miter saw you can use your table saw and set it so it cuts at a 45 degree angle!


Below you can see that I'm making my first 45 degree cut at one end of the board.  This will be so I can trim off as little material as possible so I don't waste any material when cutting the piece.

CRITICAL:  Make sure you have the piece flat and secure within the miter saw base!  If this is not flat and square to the alignment of the saw blade, your pieces won't line up and will leave a large gap when glued!


Now we need to measure the width of the table leg so we know how wide to cut the trim piece.  My table legs are just over 3" in width; 3-1/8" to be exact!

This is the measurement width you will use for the inside of the trim piece!  When you make your 45 degree cuts you need to make sure you leave 3-1/8" "or whatever the width of your table leg" on the inside portion of your trim piece.


Now slide your miter saw over to the opposite side so it is set to a 45 degree angle opposite to the first cut.

NOTE: Make sure you have the blade set to 45 degrees and that the slide is in the correct grove on the miter saw.  When you slide to blade alignment section it will hit a groove for the 45 degree angle telling you your in the correct position.


Below you can see the piece clamped in place and ready for the second 45 degree cut.

WARNING:  Always secure both ends of the material because if you don't secure the piece that you are cutting, it may move before the final cut and you'll end up with a bad angle or a miss cut!  Plus, a loose piece can catch the spinning blade and shot it across the room!  Believe me when I say this can happen because I've seen it happen right in front of me!!!


Below you can see the final piece cut and ready for gluing!  Now you only need to cut three more and your ready to mount all the trim pieces!!


Here are all four trim pieces ready for assembly!  


Below you can see three of the trim pieces temporarily set in place BUT NOT GLUED just to see how they look and fit.  Pretty nice!


Before you start gluing each piece you'll need a few things to help you out.

1.  Some surgical gloves to help keep your fingers and hands clean of glue!  
2.  A bottle of Titebond II glue
3.  A moist rag to clean up the excess glue that seeps out the cracks.
4.  A bunch of metal clamps!

When you have the above ready, go ahead and apply the glue on one of the trim pieces.  You can be pretty liberal with the glue but don't glue the 45 degree sides yet; these you will glue with the second and third pieces.

This first piece will be placed on the bottom side of the table leg, which you will then rest the table leg on top of.  When you have this piece in place AND MAKE SURE YOU SLIDE IT DOWN SO IT COVERS THE CASTER PLATE!


Now glue the second and third pieces and add some glue onto the 45 degree sides.  Fit these both to the side of the table leg and aligned with the bottom of the first trim piece.  

If any glue starts to seep out just use the wet rag to clean it off now so it doesn't harden on the surface of the material!

When the second and third pieces are in place glue up the fourth top trim piece with glue on the 45 degree angles, then place in on the top surface of the table leg in alignment with the second and third pieces!  

Now add your clamps!  Place as many clamps as you can on each side of the table leg but apply even pressure because the trim pieces are going to want to move around as you tighten them together.  

CRITICAL:  Make sure you keep the correct alignment with each trim piece so they all match up at the bottom and maintain an even alignment with the side and the bottom!  If they move around a little just loosen one set of clamps and mallet and a piece of wood to knock it in to place.  This way you don't have to completely loosen the clamps and cause the trim piece to fall off or separate!  

It may take a while to clamp everything together and still keep all four pieces aligned but above all make sure that all four pieces are aligned at the bottom of the table leg and over the caster plate!


Below is the finished table leg with the bottom trim glued in place!! All it need now is some finishing sanding and your ready to coat with a poly!


Below you can see two of the table legs finished and the difference between the legs with bottom trim and legs without!  I personally think the legs with the trim look awesome but that's just me!

What do you think?  I'd love to hear your opinion.


The last step we need to complete with regard to the table legs is the upper table leg support pieces which help strengthen the upper leg attachment to the table frame!  In the last post concerning the table legs we will cover building and assembling the upper table leg support pieces!

See you soon!