To really be able to make this work you need a table saw that can cut at least 4" think material without bogging down OR have a planer and a joiner. Now I NEVER recommend rip cutting material that is over 2" thick because this is getting into the danger zone of cutting!
WARNING: When you have a table saw blade sticking above the table by over 3" you are creating a very dangerous situation. This is a lot of blade spinning at a very high velocity and you are trying to push very thick material through this large spinning nightmare! This is not recommended unless you are very skilled and have the correct safe guards in place on the table saw! So, if you don't have a joiner and a planer I recommend you buy or create table legs using [4] 3/4" stock and glue them together to make a table leg boxes! I will try to cover this in the AFTER-POSTS when this blog is finished as a secondary method.
So for those who DO have a planer and a joiner you can continue on with these steps to create your 3"x 3" table legs.
First thing we need to do is purchase the 8/4 material and you are going to need at least 12 feet of it; minimum!
I purchased a 10' and a 3' length of 8/4 Hard Maple. This is how much you will need because each leg is 35" in length and there are four table legs!
Below is the material I purchased!
CRITICAL: Always be aware of splits or cracks in the lumber when you purchase t because it doesn't do you any good when you have to cut off an end section of your lumber because of a split and you end up with material that is too short to use! Very bad!
NOTE: The piece of the far left is not for the legs, it is for the corner piece that support the legs when they attach to the table frame and it's only 4/4 material.
CRITICAL: Make sure the lumber you purchase is not only the correct length you need but is at least 7.5" to 8" wide because you will be cutting this lumber down the middle to get two halves since their are two pieces for each table leg. This way, out of the 12' of material you have double that to compensate for the two sections of each table leg.

As you can see this is thick material and is pretty heavy so be careful when you pick it up or move it around your shop.
Below you can see all the lumber rip-cut to a width of at least 3.5" and cross-cut to the minimum 36"! You should have at least 8 pieces in total "2 pieces for each table leg"!
NOTE: Notice the rough edge on some of the lumber, this is the uncut side when you buy lumber and will be trimmed off and cut down to the exact size using the table saw, joiner and planer.

At this stage take each piece and run one edge through your joiner "not the rough edge because you will eat up too much material to get a clean flat surface" to get a perfectly flat edge. This is the edge you will use against the table saw fence to help keep your cut parallel when rip cutting each board!!
After you have all [8] boards run through the joiner, set your table saw to 3 - 1/8". You might be asking, "Why not 3" exactly?" because we want to use the planer to plane down the 1/8" on each board and clean off any burn marks or imperfections you might get from cutting such thick material on your table saw! We will be running each board through the planer to plane them down to 3" exactly after the table legs have been glued together. This way each board will be exactly the same width and you can clear off any excess glue that is left on the boards!
NOTE: You can help remove burn marks by keeping your blade clean and sharp!! Now it's possible to do all the above with just your table saw but again, it's very dangerous and can leave you with material this will need a lot of extra sanding to remove a lot of the burn marks received from the table saw!
CRITICAL: Make sure you run the two sides that you will be joining together through the joiner because this will not only remove any imperfections in the surface of the wood but make it so both side are perfectly flat and clean! This creates a really nice tight bonding surface with both pieces of wood.
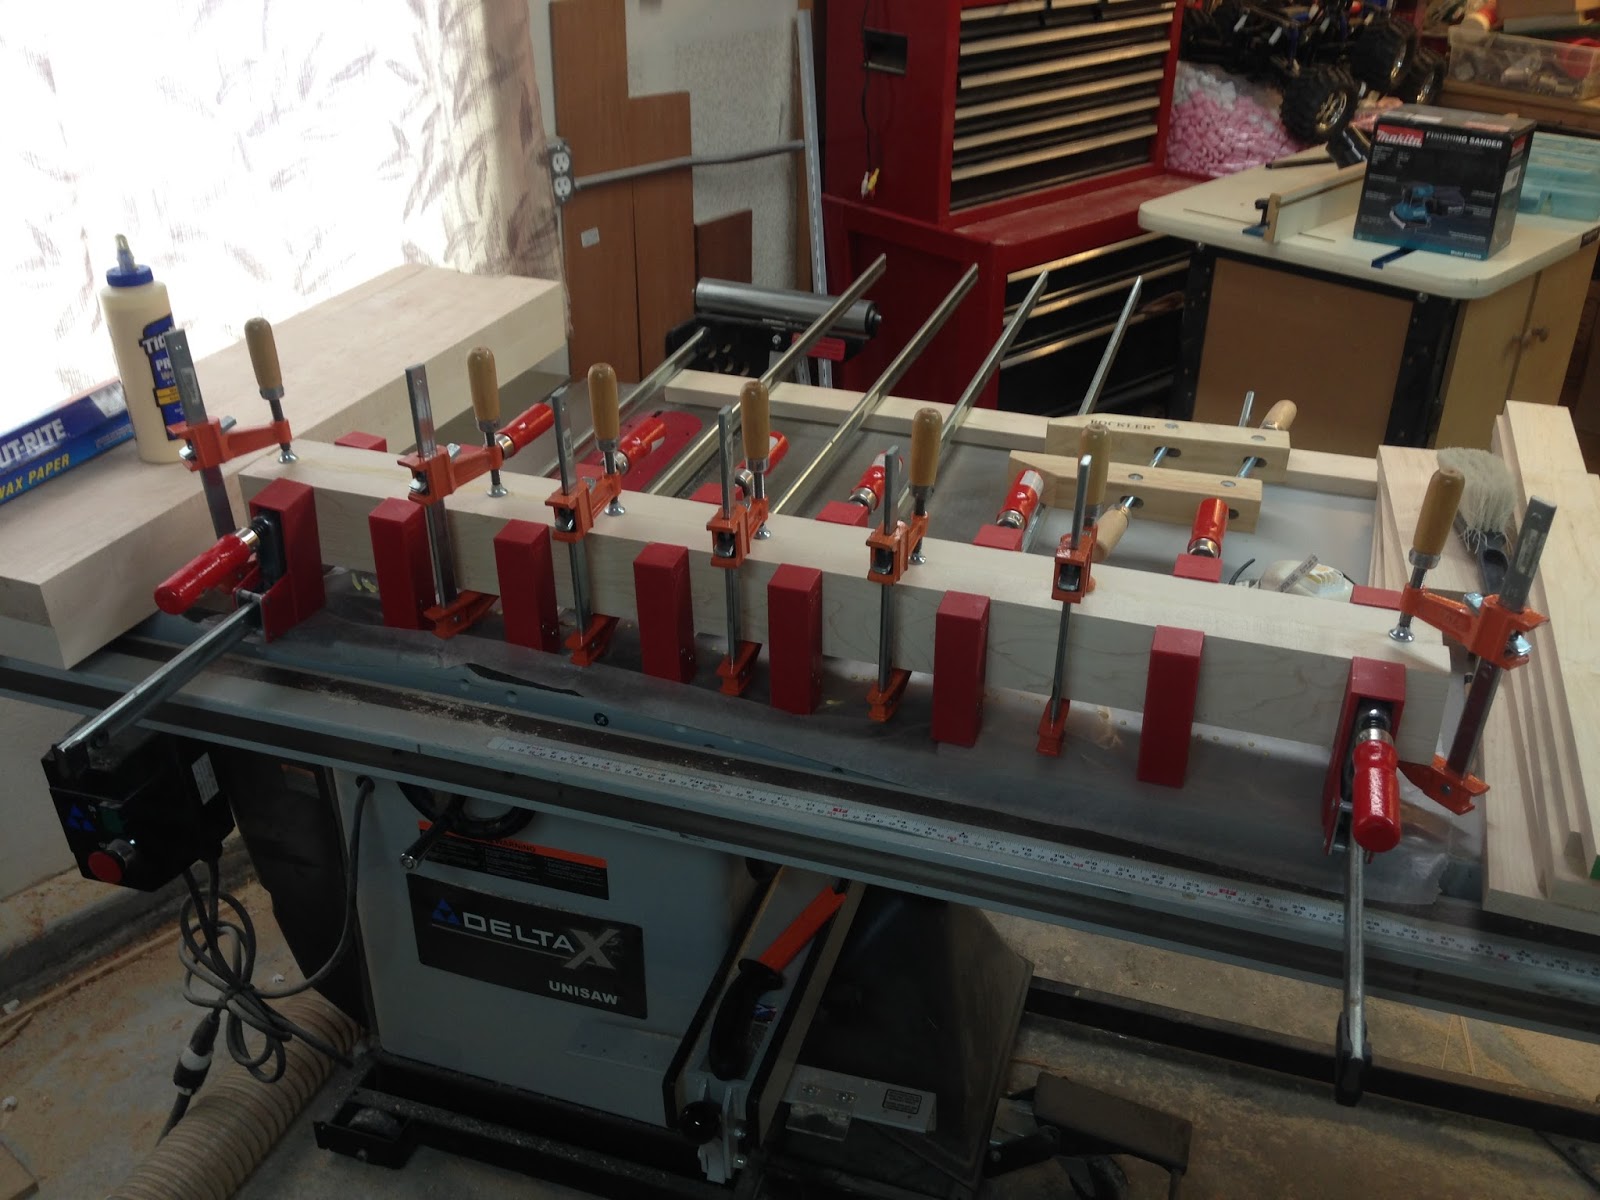
Below are all the boards cut to size and ready for gluing!!

Before you begin gluing anything, make sure you have the following items ready and at your disposal.
1. A bottle of TiteBond II wood glue
2. A couple of wet rag or paper towels.
3. Surgical gloves or shop gloves because gluing gets messy!
4. A large number of clamps: preferably the square flat head type.
5. A puddy knife or Spackle blade.
6. A sheet of wax paper or news paper to lay under the table leg and catch the excess glue.
7. A Pipe wrench or grip wrench to help tighten the clamps.
Below shows just how much glue to place of ONE half of the table leg! You only need to add glue on one side and not both. You can be pretty liberal with your glue because you will end up squeezing out the excess when you tighten up the clamps.
Go ahead and spread out the glue in a back and forth motion and make sure you cover from end to end as shown below.

Now use your puddy knife to spread out the glue evenly across the board. Wipe off any excess that starts to drip over the edge. The less glue you have to deal with in the end that drys hard on the outside is better! You'll notice how I make sure glue is covering the entire surface of the board with no wood showing underneath!

Now put the two pieces together and use a clamp as shown to keep the two pieces flush with one another!!
CRITICAL: Try to make sure you keep the two pieces flush with one another at all times while it is gluing because the more of a gap or ridge that is created, the more you will have to plane off to keep the piece square and flat!!! Use as many clamps as necessary to keep these two piece flush!


Spread out all the main clamps that will be used tighten the two piece together so they cover equal distances from each other across the entire length of the boards. You will be slowly tightening these clamps to squeeze out the excess glue from inside the two pieces!
While tightening each clamps always make sure the two pieces stay flush and if they start to create a gap or edge then loosen the clamps and realign them flush again!

Below you can see how I use the grip wrench to tighten each clamp as tight as I can get it without denting the wood!
WARNING: You can dent wood with your clamps if you tighten them TOO tight! Believe me it's possible and it sucks when it happens!

Make sure you use those wet rags to wipe off any and all excess glue that seeps out of the sides. Again, the more you remove now, the easier it is to clean off the small amount of excess later.
Here you can see all the clamps in place with everything tightened down and waiting to dry! Let each leg dry for over 24 hours to make sure they have a nice tight bond!

Below is one of four table legs after all the clamps have been removed and any excess dried glue cleaned off. I use a sharp chisel or razor blade to remove any dried excess glue blobs on the surface of the wood. Try to remove as little wood as possible while taking off the dried glue but don't be too concerned because we will be using the joiner and planer to clean up each side of the table leg to an exact 3" square dimension!

NOTE: You DO NOT want to use your table saw to do this because you will end up with terrible looking table legs that have burn marks and uneven cuts.
So at this point we need to run adjacent edges of the table leg on the joiner to remove any excess glue and give us a nice clean flat edge for the planer! A planer always needs one clean flat edge to make sure you get a perfectly even cut across the entire length of the wood.
Set your joiner so it only removes about 1/8" of material on one pass.
Run one side of the table leg through the joiner making sure you remove all the excess glue and then run the adjacent side through for one pass. Now you'll have two flat side to create your perfect 3" square table leg.
Do this same process for all four table legs!

Now run each table leg through the planer in passes to get the dimension down to 3"! Try not to cut more than 1/8" per pass so you can keep a nice clean smooth cut.
NOTE: Most planers will leave the surface of planed wood looking like it has been sanded but if you take too much material off during one pass it can leave a lot of scratches that you'll end up having to sand off. By running through the planer in 1/16" passes, you will be left with almost sanded looking wood when done!
If you want to keep the joining line of the two boards centered, "this is the line where the two boards were glued together" you will need to run both sides through the joiner more than once instead of just planing one side only. To keep the seem line in the center you will have to remove material evenly on both sides of the table leg and this means you will have to run the table leg through the joiner than through the planer evenly. Otherwise just keep planing down the table leg till you get to 3" on each side.
WARNING: Be careful when you use your joiner and planer together multiple times because if not done correctly you can produce wood that is not square or even all the way along the board. A joiner is great for making one side of the board flat and square but will not keep both sides even in thickness; this is the job of the planer. So the method is you use the joiner to get a nice flat side then you use a planer to keep both sides exactly the same thickness through the length of the entire board! If you start doing multiple passes with the joiner and the planer you need to make sure you keep this passes consistent and in order! It would be terrible is your table leg ended up tapered at one end!

Now that we have our table leg perfectly square at 3" x 3", we can cut them to the 35" length. First, we need to make sure one end of the table leg is perfectly square with a 90 degree end. To do this we will pick of the end of each table leg and trim off the end with a compound miter saw. The Miter saw will cut through the thickness of the table leg in one pass and create a perfectly square 90 degree cut at one end!
If you don't have a miter saw you can still use your table saw but will have to run the table leg through with two passes; you run one side at 1.5", then you flip it over and run it through again at a little over 1.5". This makes it so you don't have to cut through all 3" in one pass!
Below you can see how I've taken off one end of the table leg to give me a nice clean 90 degree angle end!

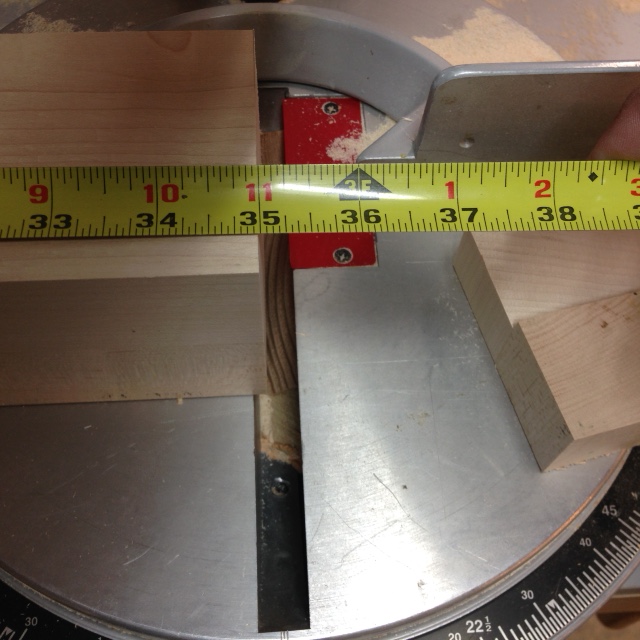
Now take the table leg and make a pencil mark at a measurement of 35" from the end you just cut with the miter saw! This measurement is what I calculated to give me the correct height I need to sit at the table with bar stools! I will also be adding casters which add about 3" to the height of the table leg!


Cut this end off with the Miter saw, which now gives you two perfectly square 90 degree ends at 35" in length!


Below you can see the verification of the 35" measurement after the cut! Go ahead and cut all four table legs down to the 35" length.
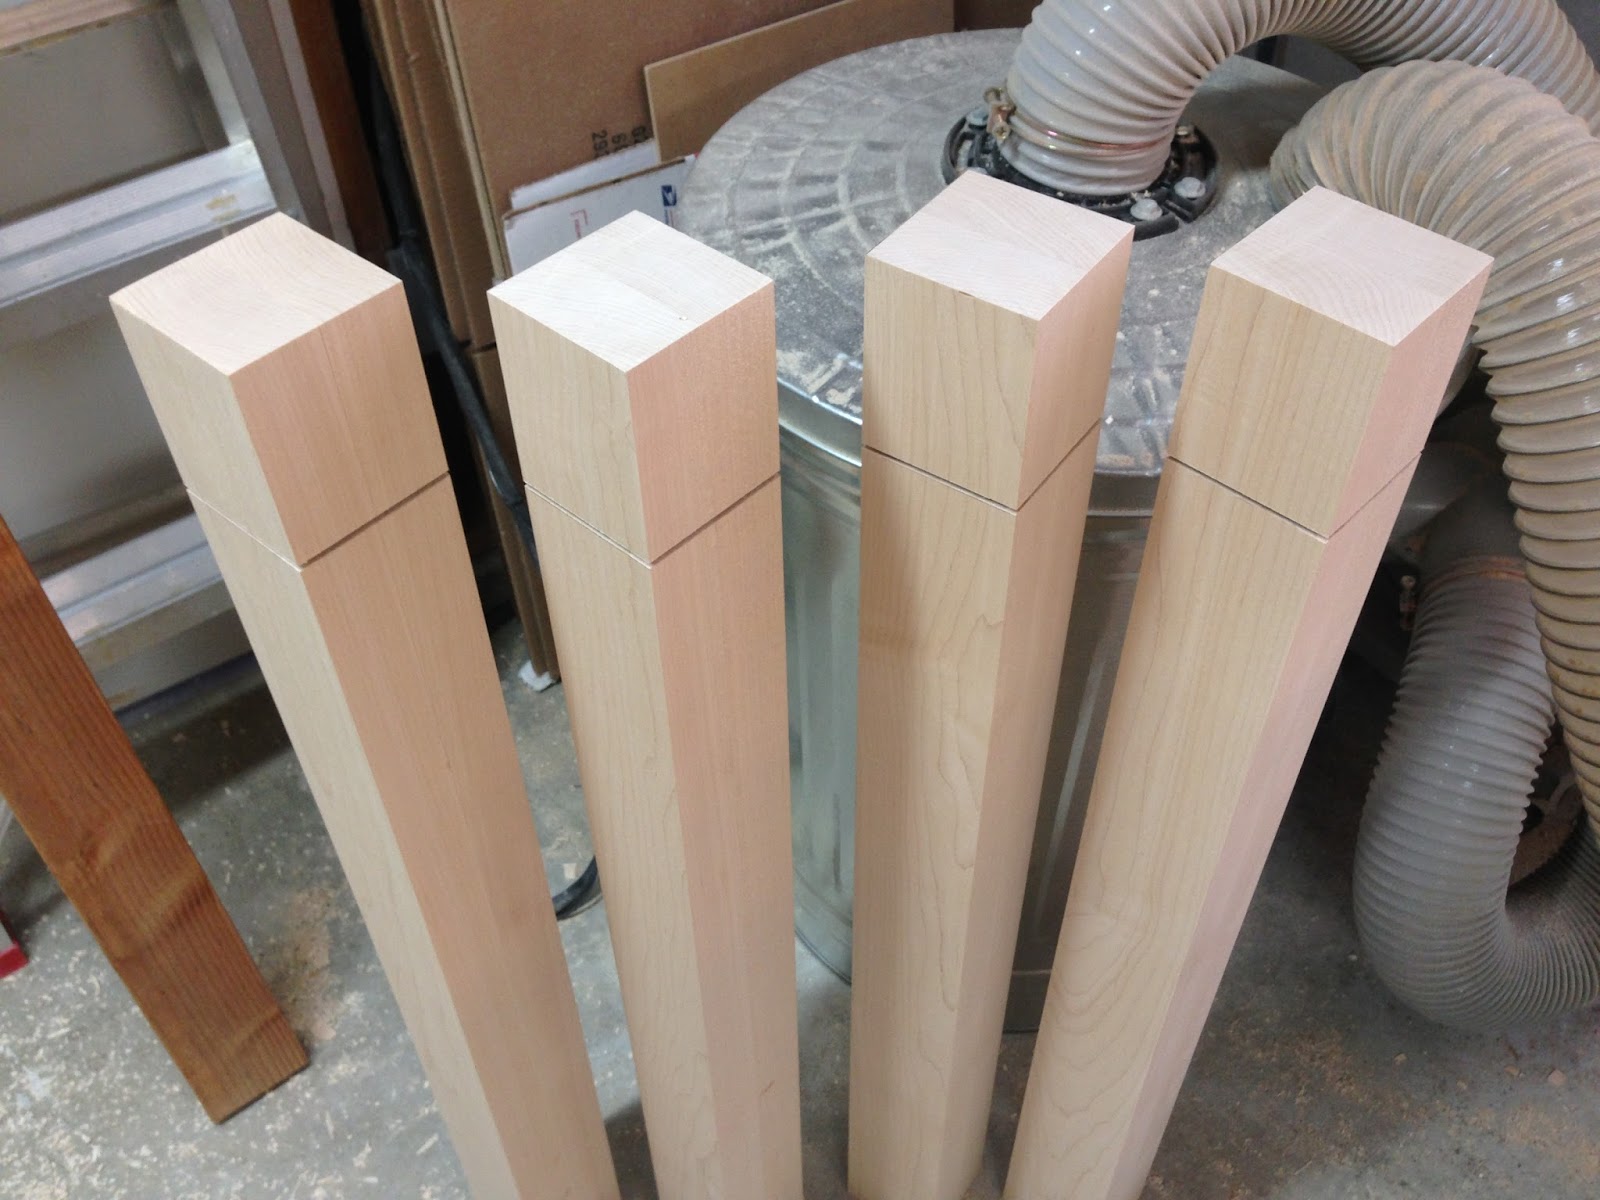
Below you can see all four table legs ready to be trimmed and routed. Each table leg is 35" in length and is 3" x 3" square!

We are now going to trim off the top of the table leg by about 1/2" of material on adjacent sides so they will help support the weight of the table. What this does is produce an overlap at the top of the table leg that allows the table frame to sit on and take most of the table weight. Otherwise the weight will be supported by the mounts and the screws, which can end up failing in the long run and cause the table to collapse.
Since the table frame is 4" in height, I want to remove a little less material than this from the top of the table leg to keep it from touching the table frame itself. The table frame will be 1/8" higher than the top of the table leg giving enough clearance from the bottom of the actual gaming table that will rest on the table frame!


Below shows the two sides you will be trimming down.

Set your table saw blade height to 1/2" and make your first cut.

Rotate the table leg 1/4 turn to the next side that needs trimming.

Below I rechecked the measurement to to verify they that I have the correct distance and depth!


Below you can see all four table legs cut and ready to be prep cut for the router. The prep will be making multiple passes along the upper portion of the leg to make routing easier and quicker.
Here you can see how I keep the same table saw blade height and make 1/8" to 1/4" cut passes to remove excess material to make the routers job easier!
NOTE: To speed of the process I cut all four legs at the same time!


Now that I have the prep work done I can setup the router table to remove the excess material. Set the router bit to a height of 1/2"!


Below you can see what it looks like when some of the material is removed.


CRITICAL: Make sure that you have a clean transition of a 90 degree angle at the edge which will rest against the table frame. It you didn't trim exactly against the edge face you will have a slight lip when will cause a gap when the leg is resting on the table frame, use the router and a perfect pass to clean off that lip.


Now we can setup the router table to route the decorative grove that runs up the edge of the table leg. To make this grove you will need a 5/8" round bit. This bit will allow you to route a arc grove along each of the four corners of the table leg.


Below you can see the STOP-BLOCK I used to provide a starting point for the groove on the upper portion of the table leg.. Without this stop-block we'd have a hard time making sure each groove starts in the same exact place on each side!
NOTE: You can see in the photo the gap with the fence plate and the router bit where the dust intake is. Make sure you make this gap as small as possible to avoid chipping and splintering! The fence helps keep the material secure against the fence while the router bit is spinning at very high speeds!

Set up the STOP-BLOCK to the following measurement of 4-14/16" from the front edge of the router bit to the stop-block!

Below you can see me checking the accuracy of the measurement.

After you route the initial starting groove on all four table legs, let's mark off how far we want the groove to extend on the leg. Place a pencil mark at the opposite end of the table leg from where the initial groove is. The pencil mark should be 4 - 1/4" from the bottom edge of the table leg! Mark each side of the table leg and don't worry about the mark because it will sand off during finishing!


The STOP-BLOCK I used was my workbench! I set the router table so when I push the table leg along the router table it would stop against the work bench right at the pencil mark. Once I got this distance I locked the casters on the router table.
CRITICAL: You need to make sure you router table WILL NO MOVE when you hit the table leg against your stop-block obstacle!! If the distance changes during the routing of all four table leg you will get uneven grooves and it will mess up the look of your table legs!

Below you can see where the table leg stops and the groove ends.
NOTE: When you start to get close to the end of the table leg slow down and once the table leg hits the stop-block, slowly pull the table leg away from the STILL SPINNING router bit!!
CRITICAL: Don't let the table leg sit against the bit too long and don't turn off the power to the router while the table leg is against the spinning bit because it will cause a burn mark in the groove which will be hard to remove. You would end up having to run through the groove again but at a deeper setting to remove the burn and this means you would have the change the settings for all the table legs!! Always pull your material from the spinning router bit when you've finished your cut!

Here are all four table legs routed and ready for the bolt attachment at the top of the table leg!


Now that the table legs have been routed with the decorative groove, it's time to use the KREG pocket hole jig to create the supports to attache the table leg to the table frame!
Make your pencil marks on the top portion of the table leg at measurements as follows:
3/4" from the top and 3- 1/4" from the top of the table leg!
NOTE: This measurements will allow you clearance from the table frame to get to the pocket hole screws and screw in the table legs!!
These marks are where you will set your Pocket hole jig.
CRITICAL: You pencil marks should only be on two sides of the table leg AND on the sides that are NOT of the routed out sections!!!! SEE BELOW!

Lock in your table leg to the KREG pocket hole jig and drill the two holes on two sides of the table leg that DID NOT GET ROUTED! You will have adjust the jig lock all the way out to get it out of the way and since it won't work with such a thick piece of material, you'll have to use a clamp to secure the table leg in the Pocket Hole jig as shown below!


Two holes complete and two more to go!! Damn I love my KREG Pocket hole jig!!!

Below you can see one of the finished table legs with all four holes drilled!

Now that the table legs have their pocket holes complete to secure them to the table frame, we need to route the top section of the table leg to supports the upper part of the table leg to the table frame! In this section we will be routing off the inner top corner of the table leg to allow for a 45 degree section piece that will get secured to the table frame with the KREG pocket hole jig.
We first need to cut a depth marker to show where the route ends on the table leg. Plus it provides a depth indicator for how much material we will be routing off the upper portion of the table leg!
Set your table saw to a height of 3/4"!

Then set a STOP-BLOCK on the table saw at a distance that is 1/8" less than the routed gap at the top of the table leg! The reason for the 1/8" less is because you don't want the support piece to show from under the table leg when it is set in place!
Place your table leg on it's 45 degree corner edge and cut the initial slot on the upper portion of the table leg that was not routed; it will be part of the original table leg material!
NOTE: The photo below shows the setup for the stop-block and the position of the table leg before it is cut! You will notice how I used a triangle to help keep the 45 degree angle while the table leg is on the table saw!!


Below you can see the cut that is made where the bottom portion of the area will be routed off!
Odd, I just noticed it looks like a face! LOL!

Below you can see the jig I made to help route off all the excess material that needs to be removed from the top portion of the table leg! This jig will help hold the table leg in a 45 degree angle it needs while allowing you to slide the table leg up and down and the jig back and forth against the spinning router bit so it can remove all the excess material!
CRITICAL: You need to make sure you hold the table leg secure on the jig while it get moved around, which can be very hard since you will also be moving the table leg back and forth! To help make sure you don't try to remove too much material at one time, raise the square tip router bit in 1/8" increments which will be easier on the router and will cause less force on the table leg as you move it around! Just make sure you do not go beyond the depth of the initial table saw cut!!!!


Below you can see the table leg placed in the jig and ready for routing!

Below you can see me taking passes at the router bit removing small amounts of material at a time until you reach the depth indicated by the table saw cut!

Below you can see the finished table leg! Once you have all four table legs completed you can add the support bolt!
CRITICAL: Make sure you have a nice clean flat edge when finished routing the table leg. It needs to be flat and consistent so the secure piece will lay absolutely flat on the edge of the table leg and help keep it from moving around against the table frame!

Let's finished up the table legs by added the support bolt that will be used to secure the upper portion of the table leg to the table frame!
Create a pencil mark that is 2" down from the top of the table leg and center to the routed area!


CRITICAL: Make sure you don't go down too far with the 1/4" bit because you will end up creating a hole that the bolt can't sink it's threads into and will end up causing the bolt to pull out when you secure the nut on it!!! Also, you don't want to force the bolt into too much wood material on the table leg because Maple is hard and doesn't give at all and will end up splitting the wood if it has to force it's way deep into the table leg!!


Now go ahead and screw in the bolt! You can do this by using two nuts and a washer! Setup the nuts and washer as shown below and lock them together so you can then use a socket wrench to tighten the bolt into the table leg!
CRITICAL: Make sure you don't screw in the bolt too deep and stop just beyond the start of the normal nut threading!!


Below is a photo of the finished bolt secure in the top of the table leg!! Go ahead and finished the other three table leg in the same process as explained above!


All four table legs complete and ready to be mounted to the table frame!

No comments:
Post a Comment